1. NEST Integration Cost
A monthly charge applies to Primo-NEST Pension Integrated companies and will be displayed on the NEST ‘Setup Payroll Only’ screen.
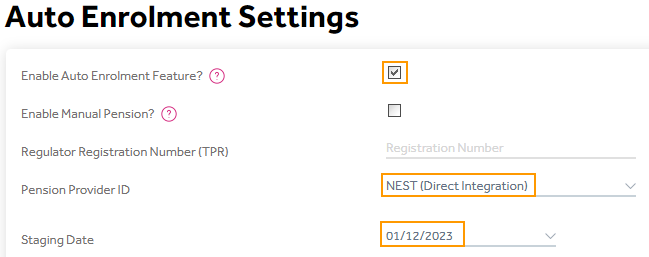
2. Company Settings > Auto Enrolment > Settings
Enable the ‘Auto Enrolment Feature’, enter the ‘Staging Date’, select the pension provider as ‘NEST (Direct Integration) and then click Save.
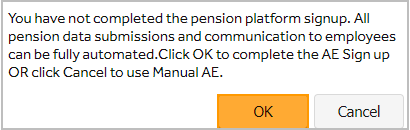
The program will ask you to complete the AE Sign-up as shown below. Click OK to proceed.
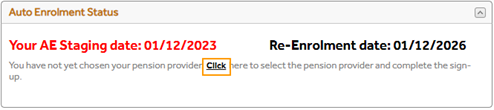
Alternatively, you can also complete the AE Sign-up from the below screen as well.
Employee List Screen > AE Status > Click the ‘Click’ to select the pension provider.
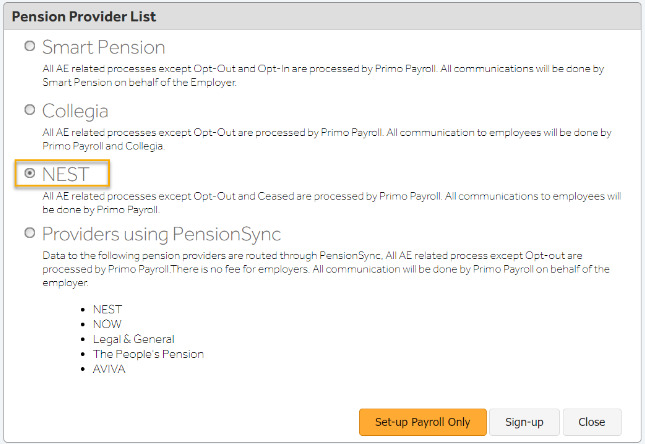
3. NEST Scheme Setup
(1) Select the pension provider as ‘NEST’ and click ‘Setup payroll only’.
(2) Enter your NEST Employer ID, Postponement Period, Notification Email, Username and Password of your NEST pension account, read and tick the checkbox and click ‘Retrieve Setup’.
 Once the ‘Retrieve Setup’ is clicked, Primo attempts the below action. It is a 3-stage process.
• Stage 1: A request is sent to NEST to validate the scheme credentials. NEST will accept the request and provide an on-screen acknowledgement timestamp.
• Stage 2: Primo will automatically check the status after the given timeframe and the user will receive an email notification about the Stage 2 response.
• Stage 3: The user should wait for the ‘Stage 3 – Response completed’ email notification from Primo.
If Stage 3 is successful, Primo will update the Primo NEST settings. In case of any failure in stages 2 and 3, the user should check the failure reason and action accordingly.
(3) Retrieve New Group & Payment Source
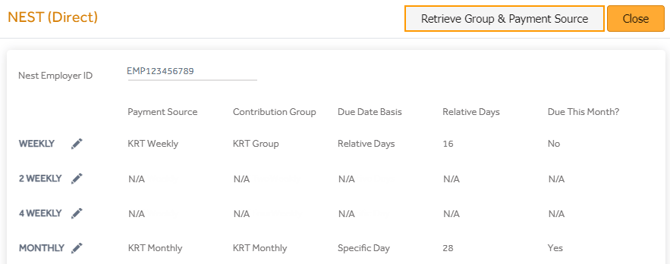
• If the user creates a new Contribution Group or a Payment Source on NEST, click the ‘Retrieve Group & Payment Source’ button to download them here.
• The program selects the default Payment Source available. If you’ve more than one Payment Source, you’ll need to change them accordingly by clicking the edit button next to the Pay Frequency.
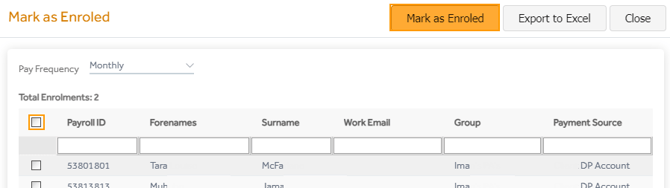
4. Mark as Enrolled:
Employee List Screen > NEST dropdown > Mark as Enroled
If you're integrating your Primo Company with NEST Pensions after you've already enrolled your employees on the NEST Portal, then you must mark the employees as already enrolled. Otherwise, it will create duplicate employee records on the NEST Portal.
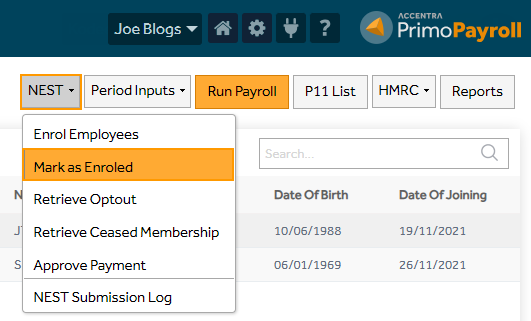
Select the employees that are already on the NEST Portal and click 'Mark as Enroled'.
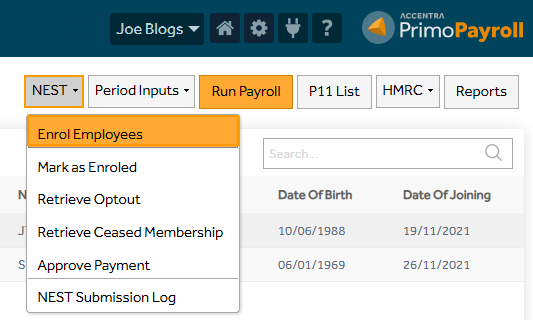
5. Enrol Workers:
Employee List Screen > NEST dropdown > Enrol Employees
After Run Payroll, if the employees are categorised as Eligible Jobholders to be auto-enrolled, or you have Non-Eligible Jobholders opting-in or Entitled Workers joining-in, then you’ll have to enrol them into NEST Pensions.
To Opt-in a Non-Eligible Jobholder or Join-in an Entitled Worker, the user can action this from the Employee List Screen > Employee Action dropdown > Opt-in/Join-in to Pension
Note: The user should make sure the employee’s data is correct before enrolling the employees with NEST. Once enrolled, only the employee will be able to make further changes to his personal details on the NEST portal.
After enrolling the employees, NEST acknowledges with a timestamp to get their system updated. It is again a 3-stage process, i.e.,
Stage 1: Request being sent from Primo,
Stage 2: Process completion,
Stage 3: Response retrieval. The user will receive an email notification on the successful completion of Stage 3.
The payroll user should wait for the above stages to be completed before submitting the pension contributions (i.e., closing the period) for the enrolled employees. In case of any failure in stages 2 and 3, the user should check the failure reason and action accordingly.
6. Retrieve Opt-Out and Cease Membership information
NEST dropdown > Retrieve opt-out/Cease membership
When an employee opts out/ceases membership of the pension scheme, the information will be available to download from NEST. The user should make sure to retrieve the opt-out/cease membership information 'before Run Payroll', failing which, the employees will again have pension deductions that will not be accepted by NEST.
Note: This is a 3-stage process.
• Stage 1: The program will send a request to retrieve the opt-out information from NEST.
• Stage 2: Primo automatically checks after the timeframe with NEST.
• Stage 3: When NEST provides the information, Primo automatically downloads and updates the user by sending an email notification.
The user should run the payroll only after receiving the Stage 3 completion email. In case of any failure in stages 2 and 3, the user should check the failure reason and action accordingly.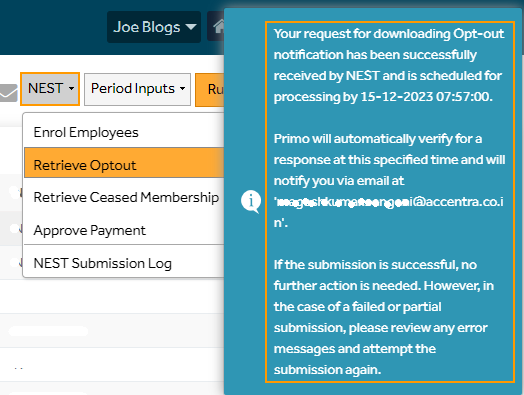
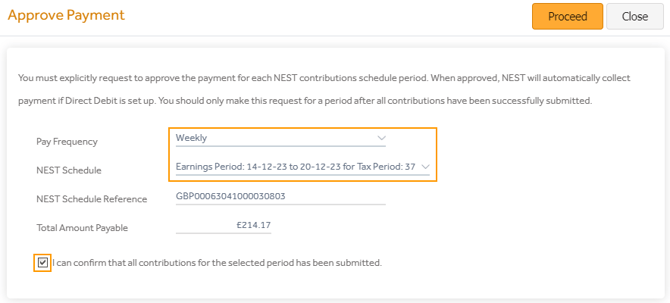
7. Approve Payment:
NEST dropdown > Approve Payment
(Direct Debit Setup should be completed on NEST before approving payments in Primo)
The pension contributions will be uploaded to the NEST portal when the 'Close Period' is done. The user should cross-check if the contributions have been updated correctly. Once the contributions are available on the NEST portal, the user can then approve the payments. Select the Pay Frequency & NEST schedule which will populate the NEST Schedule Reference and the total amount payable. Tick the checkbox and click Proceed.
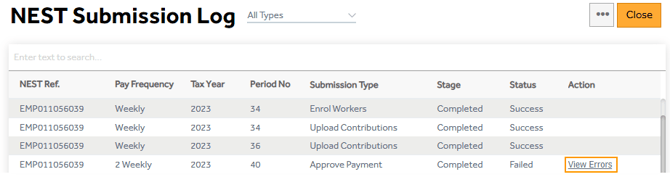
8. NEST Submission Log
The program maintains a log for all the submissions made to NEST. The user can select the filters to view the required logs, its current stage completion and the Status. The user can click the ‘View Errors’ to check the errors in the submission, an email of the same would have already been emailed to the user.
9. Pension Contribution Submission
The pension contributions get submitted to NEST pensions when the ‘Close Period’ is done. The user should check the below dates before closing the period.
(1) AE Submission Date: This should be the end date of the earnings period NEST is expecting for the current period.
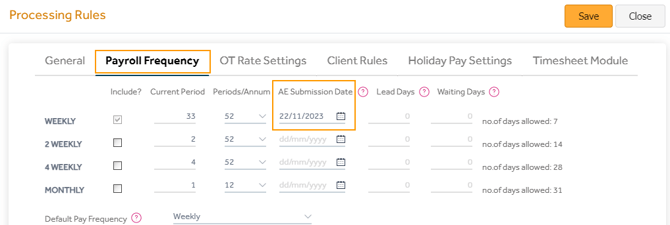
(2) Close Period Pension Start & End Date
 The cut-off time for processing the pension contributions submitted is shown under the section ‘Indicative Response Time’.
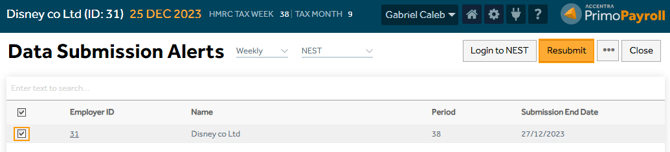
10. Data Submission Alert
If the pension contribution submission fails for some reason, the program will populate the count in the Notification (Bell Icon) > Auto Enrolment Tasks > Data Submission Alerts. The user should correct the errors and resubmit the pension file by clicking the 'Resubmit' button.
The Data Submission Alert of the previous period must be cleared before attempting to run the current payroll.
11. Indicative Response Times given by NEST
Cut-Off Time:
There is a daily cut-off time of 18:00 for the Enrol workers, update contributions, and approve for payment web services where the request contains => 1,000 records.
Requests received after 18:00 will miss that night’s batch processing and will only be processed in the next day’s batch. For example, for requests with => 1,000 records received at 19:00 on a Monday, we’ll aim to process these in Tuesday night’s batch, and the response should be ready by Wednesday morning.
Request Processing Time:
